


Your Custom Text Here
Check out our blog for garden tips, seasonal recipes, responsible pest control, thoughts from our staff, and more!

An adult Magicicada by Dan Mozgai/ cicadamania.com
All non-native fruit trees (apple, pear, cherry, bush cherry, persimmon, pomegranate, etc)
Raspberry / Blackberry brambles - if not well established
Serviceberry (Juneberry / Amalanchier spp.)
Maple - when immature
Chestnut
Redbud
Pecan
Hybrid Hazelnut (Corylus avellana 'Jefferson' and other cultivars)
Chokeberry
Blueberry
Currant/Gooseberry
Pawpaw
Sumac
Fig
Viburnum spp.
Most Conifer spp.

A young Hybrid Hazelnut (Corylus avellana ‘Jefferson’) that will need protection.
Floating row cover or insect barrier netting work great - you don’t want any type of netting with gaps large enough to let the cicadas in or tangle around a bird’s leg.
You can start by draping the fabric over the tree or shrub. If the tree is larger than the width of the fabric, you will have to make overlapping layers.
Finish by tightly wrapping a few layers around the main truck to prevent the cicadas from climbing up under the netting. You can secure the base with some twine or a zip tie; make sure it is snug but not so tight that it will damage the bark
Cicadas can weasel in through any gaps 1/2 inch or larger, so you will have to tape the edges or staple it every 1/4 inch.
Full service protection: Edible Eden will cover trees/shrubs in late April and remove covers in late June.
Retail sales: Edible Eden will provide local sales of tree covers (pre-shaped for trees and easier to use) and pre-cut sections of row cover/insect netting for customer use. Supplies are limited, email us today to purchase! (Local pickup only.)
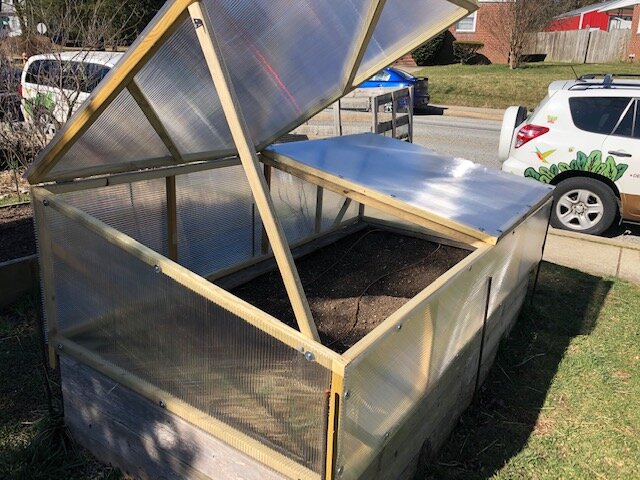
One of Edible Eden’s custom-built coldframes.
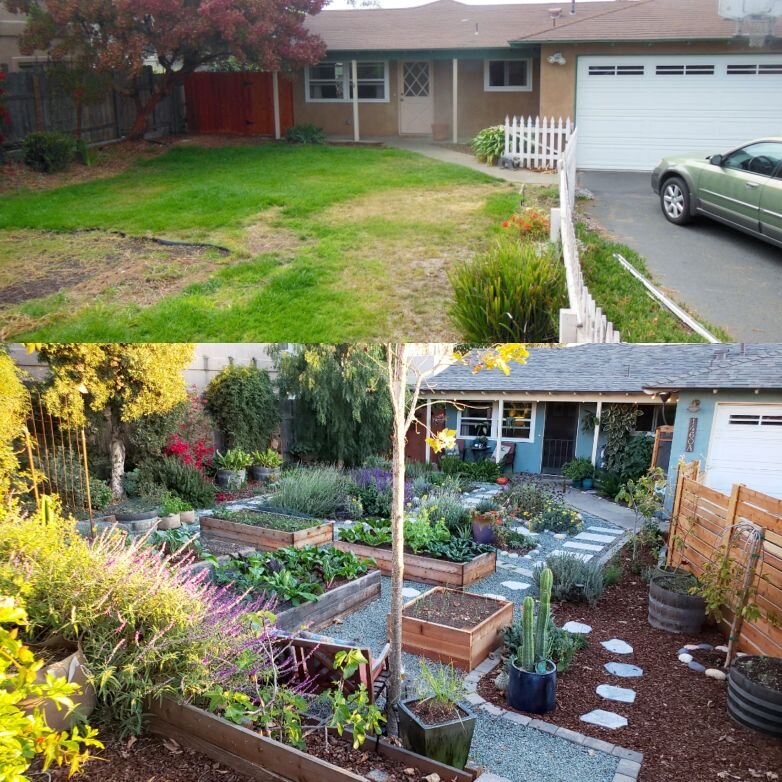
The Homestead and Chill front garden. Check out Deanna’s work on Instagram at @deannacat3 and her blog at homesteadandchill.com .

One of Edible Eden’s custom-built coldframes.
You’re going to want to check out the full instructions on her blog through the link above for full instructions on how to use your food dehydrator or oven, but here is the ingredient list to get you started:
1 large bunch of kale, or about a dozen large leaves
1/2 to 1 full tablespoon of extra virgin olive oil for drizzling
Sea salt or your favorite seasoned salt, to your own taste
Deanna uses a number of different seasons to keep things interesting, including garlic powder, onion powder, curry or turmeric powder, black pepper, cumin, lemon powder, chili powder, everything-but-the-bagel seasoning, and nutritional yeast for a splash of umami flavor.
A strainer and mixing bowl, or a salad spinner
A food dehydrator, or oven and baking sheet

Deanna’s photo of her Homemade Crispy Kale Chips.

Durable cedar cold frames, custom-built to fit your raised beds, extend your season to grow fresh greens through the winter.
Custom cattle panel deer fencing. A beautiful way to keep Bambi and Fido out of your veggies.
Salad Table raised planter, built of naturally food-safe, rot-resistant cedar. Perfect for patios and an ergonomically friendly harvest.


Native bumblebee and skipper butterfly on thistle.
The widespread use of pesticides is having detrimental effects on the health of most, if not all, living creatures. There are studies detailing the effects of these toxic chemicals on humans, fish, amphibians and birds. It’s clear that eliminating or reducing pesticide use can have benefits far beyond the benefits to native bee populations.
As part of our gardening practices, we avoid pesticide use as much as possible and use carefully selected organic products when necessary. However, not all organic pesticides are safe. Do your research before applying any pesticides, use them sparingly, and apply them in ways that are less likely to harm visiting pollinators. Better yet, monitor your plants to see if the pests are truly a problem or if they are part of a healthy ecosystem, attracting beneficial insects to keep their populations in check.
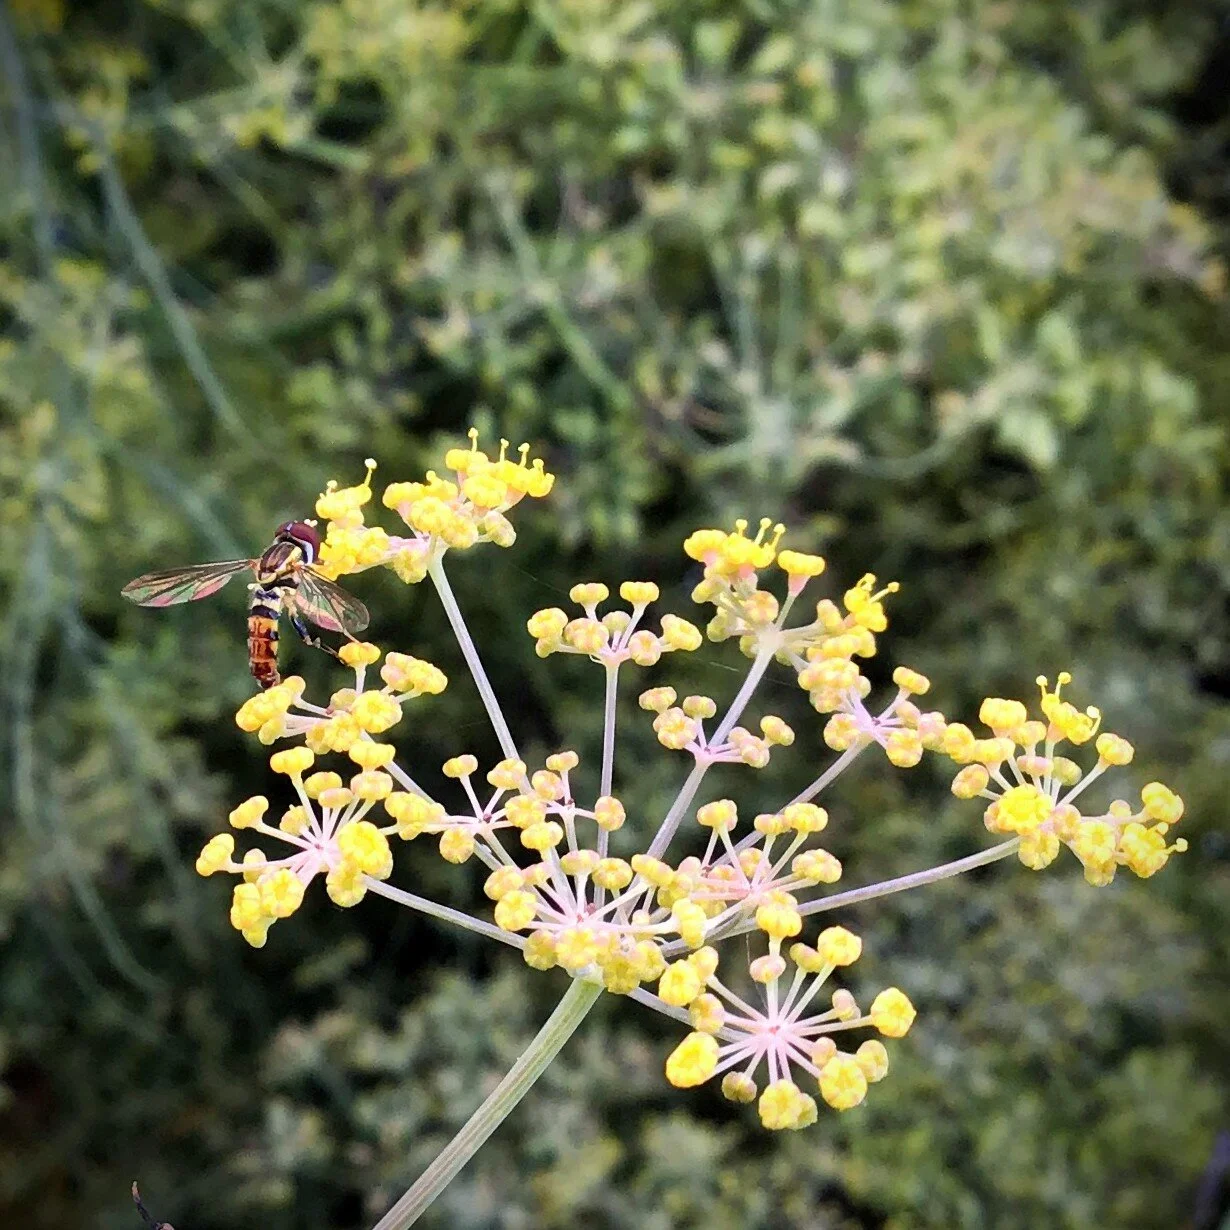
A tiny bee-mimicking fly drinking nectar from Bronze Fennel. Many species of flies are also beneficial pollinators, and some have even evolved to look like bees.
Bees are struggling to keep up with the constant loss of habitat due to land development for commercial, agricultural, or residential purposes. One way that we can help to ease that burden is by reintroducing habitat to ecologically dead space, such as our lawns or patios!
There are many pollinator friendly plants available in the horticultural trade, but you’ll always get the most bang for your buck, or the most ecological benefit for your available space, by choosing native plants. Well-functioning ecosystems have plants and animals (including insects) that have evolved together and developed complex relationships.
While any bee may be able to get plentiful nectar from non-native zinnias, many native bees are specialists who use specific native plants to meet their mates or collect the pollen that they feed to their young. Many of these plant/pollinator mutualistic relationships are yet to be discovered, but it’s a sure thing that planting native is the way to discover them.
You might not think that bees get thirsty while buzzing around all day drinking nectar, but that’s like thinking that we wouldn’t get thirsty just because we eat juicy fruits! Water is just as important to bees as to any other creature.
While honeybees like to drink from a shallow pool of mucky water (the dirtier the better, apparently!), most native bees collect their water from the leaves of plants or other surfaces. Mason bees need a source of wet, muddy ground in the spring while they are building their nests.
Whether you decide on providing a shallow dish of water (filled with marbles or pebbles to prevent the bees from drowning) or simply watering some of your perennial plants from overhead in the morning, the bees will thank you.
A good habitat is more than a source of food and water, or else some of us would probably live in our favorite restaurants. Just like us, bees need space to sleep and raise their kids.
Most native bees don’t live in large colonies like the social honeybees that we are most familiar with. In fact, most native bees are solitary species that don’t live in colonies at all! Providing a range of nesting habitats for native bees is not only easy, it can also give you an excuse to not have to work as hard in your garden.
The Mason bees mentioned in the previous section collect mud to create partitioned cells inside of hollow reeds. Leafcutter bees are similar, finding a hollow place to line with whimsical cocoons built from leaves and flower petals. Other bees may nest in ground burrows or bore holes into soft wood, like that of a dead tree.
To sum it up, providing habitat for native bees means one thing: leave a natural area in your yard and don’t work so hard at cleaning up your lawn debris!
A metallic green sweat bee, most likely Augochlorella aurata, on Stokesia laevis, or Stokes’ Aster.
Native bees are generally peaceful creatures. Unlike honeybees who can sting only once as a sacrificial act, native bees lack hooks on their stingers and can sting multiple times. Despite that fact, native bees are even less likely to resort to stinging! The stakes are lower for most solitary bees, who are not tasked with protecting an entire colony, and it is very unlikely that you would be stung by a native bee unless you were causing it harm.
The key is to stay observant (to avoid any accidental bee squishing) and keep calm; don’t assume that bees are out to get you. Honing your identification skills can also help. One family of bees, the sweat bees, are named because they like to land on you and collect the salt from your sweat! Knowing that they are peaceful sweat collectors may help you to enjoy the experience rather than swatting and possibly causing them to sting.
The previous tips are helpful to anyone who is interested in bees, but what about visitors who are fearful, or even allergic? “Prevention is the best medicine” applies here. When planning your garden, avoid putting pollinator plants near key areas such as your front gate, front door, mailbox, or children’s play areas. Native bees will generally stick to their chosen plants and nest in undisturbed areas. Planting in a less-trafficked area can provide peace of mind to bees and visitors alike. Consider placing a “Pollinator Garden” sign or telling visitors about your plants and where they are most likely to encounter bees in your yard. Overall, bees are happy to keep to themselves, but a little planning and education can go a long way in keeping everyone safe.
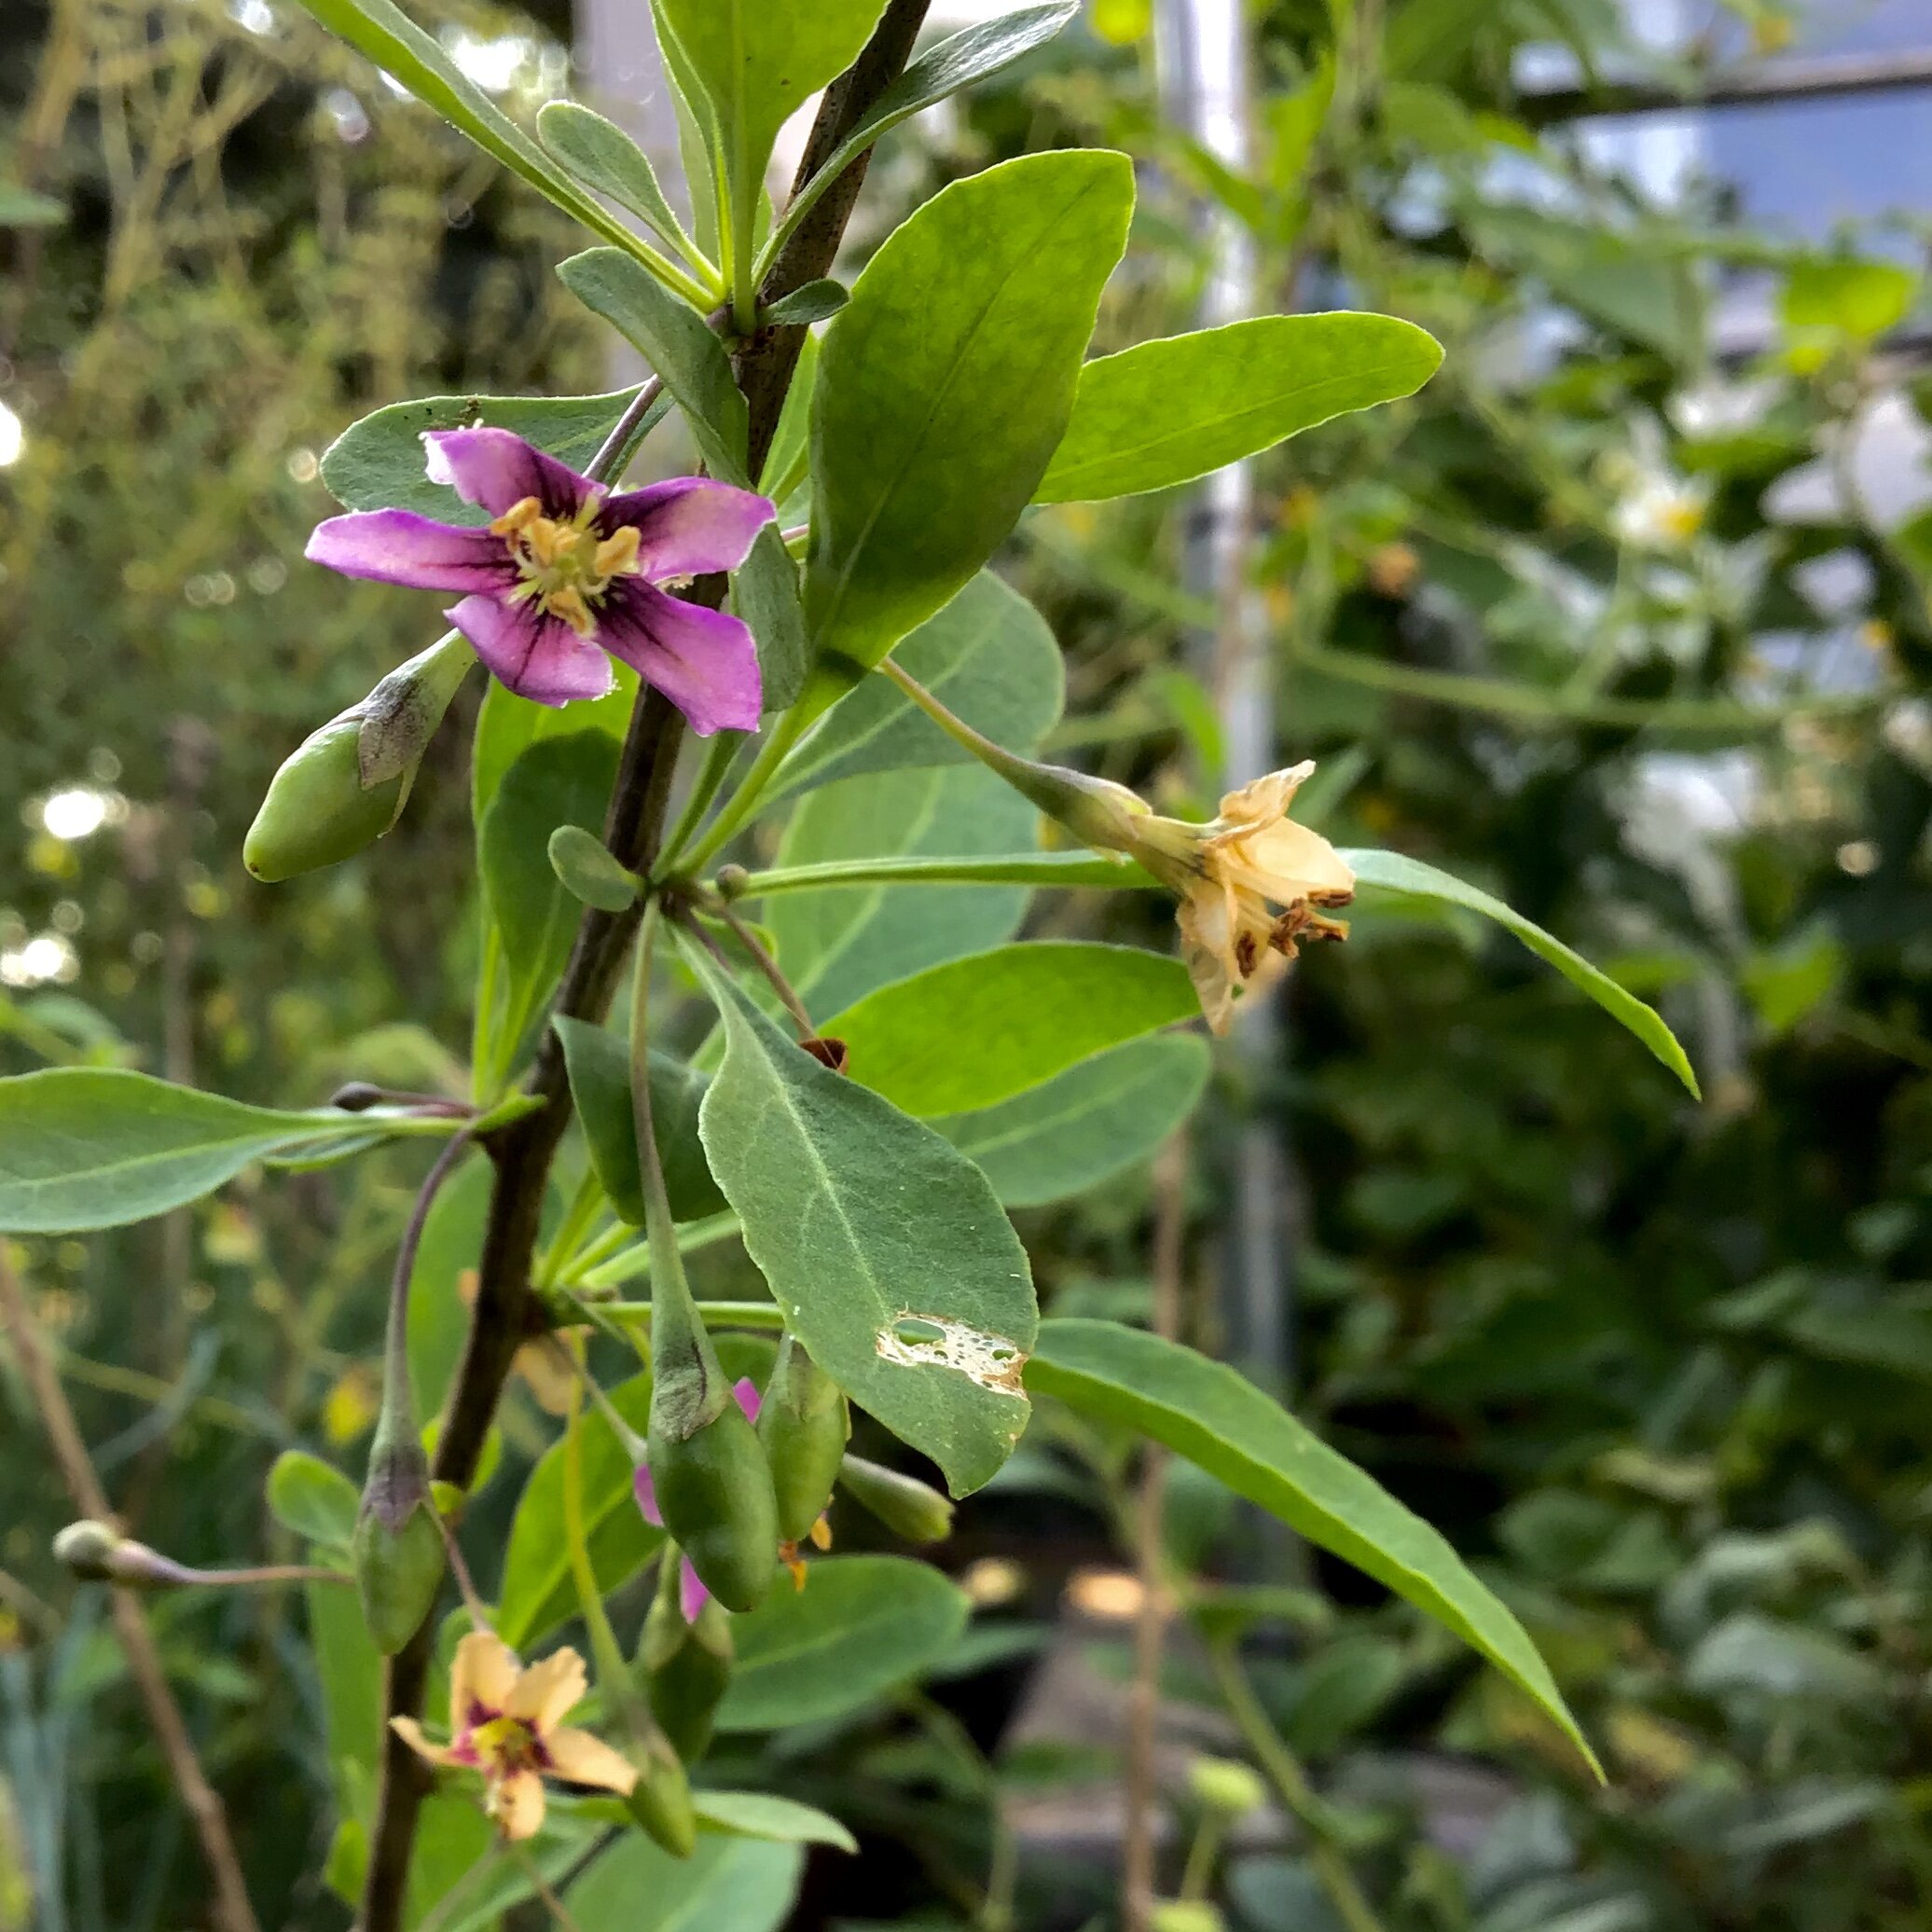
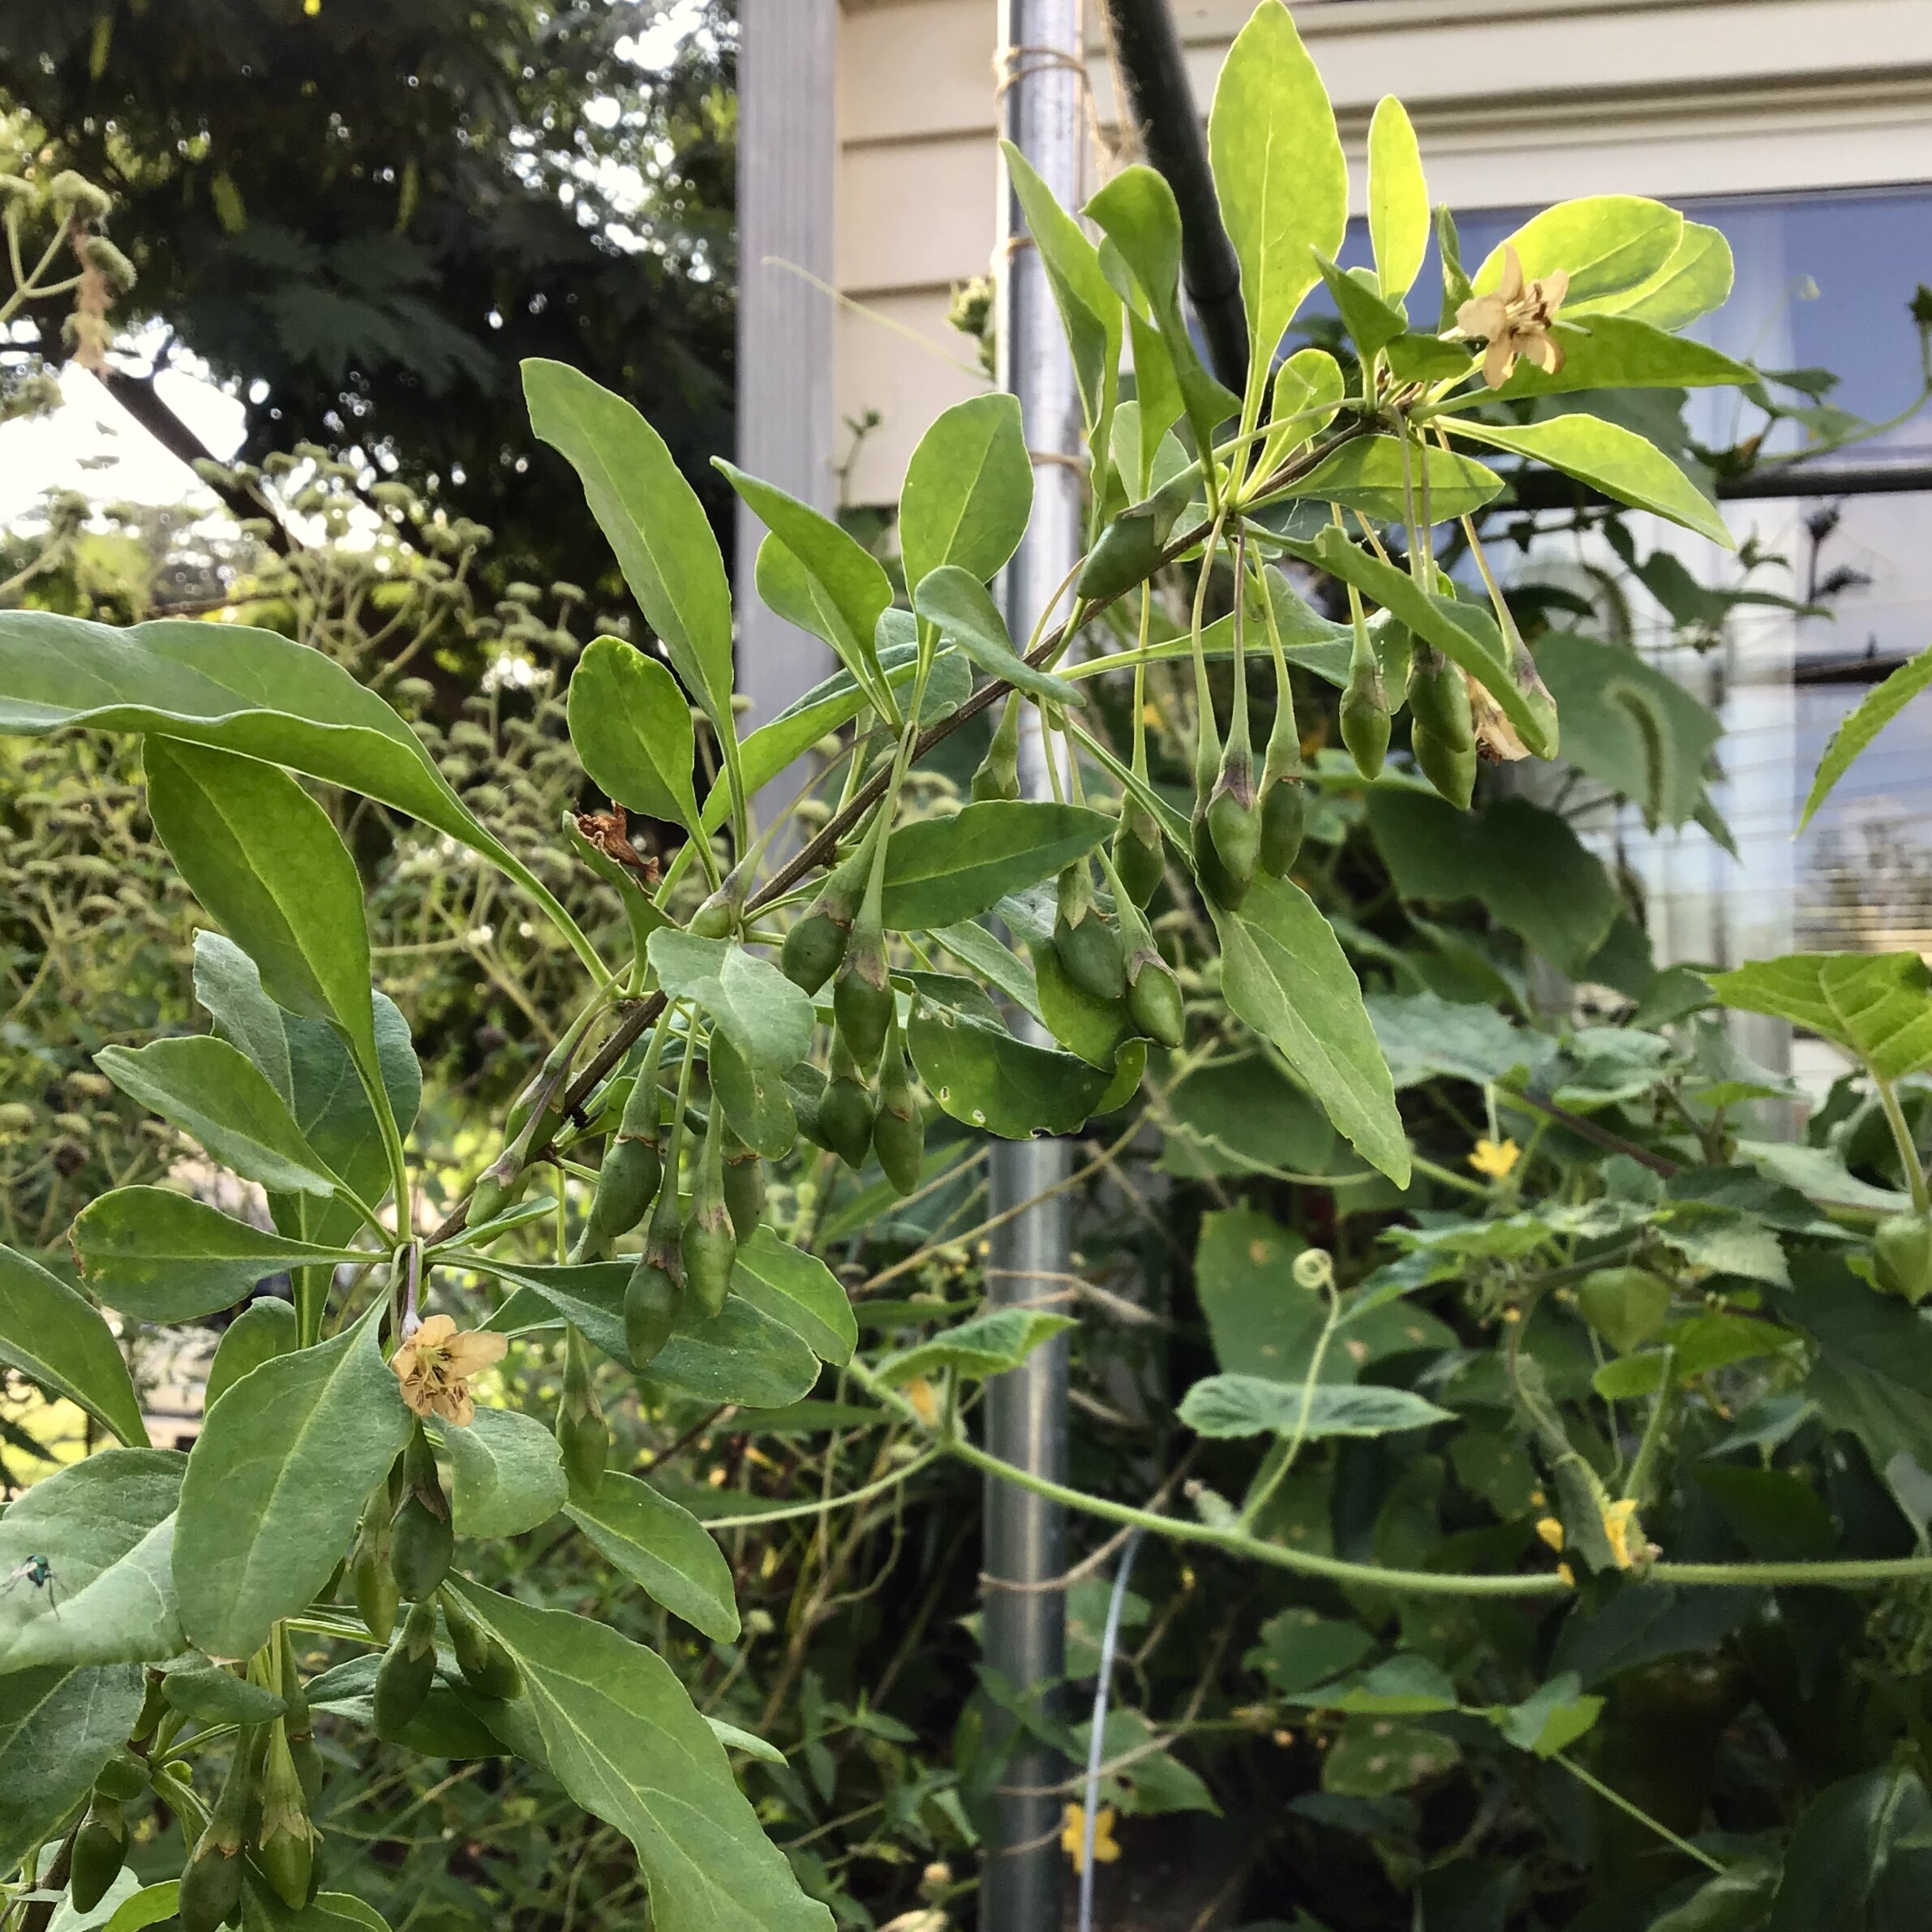
Edible Eden’s flowering and fruiting Goji Berry plant!
Growing Goji at home is fairly easy to do! Goji plants prefer fertile, loamy, well-drained soils with a neutral to very-slightly acidic pH. They are sensitive to high salinity in the soil and should not be planted near roadsides that may be salted during winter. However, Goji is very cold tolerant, surviving up to USDA zone 2. As long as your soil is not too heavy, wet, or salinified, Goji plants will grow vigorously; sometimes too vigorously! They will spread and may pop up in nearby areas of the garden, similar to raspberry brambles, and even have a similar cane-like structure.
Goji plants will begin to bear fruit relatively early, when the plant is only about 2 years old. If you are planting a nursery-grown transplant you will likely only have to wait until the following year for your first crop. Berry production will reach its maximum yield when the plant is about four to five years old.
The fruit-bearing flowers form along the entire length of the current year’s stems. Similar to raspberries, the stems (or canes) that fruited in the previous year should be cut back to the ground. The main purpose of pruning Goji plants is to remove spent canes that will block light and airflow to the rest of the plant. It is best to let the new canes reach their full length, then cut the very tip. This will increase your yield by encouraging lateral branches which will also produce fruit.
While you can prune for size if you are working with limited space, cutting back the current year’s new stems will reduce your yield. A better, more aesthetically pleasing way to use the space would be to train the canes over an arbor trellis. You may need a small ladder to harvest some of the fruit, but it keeps the area neat and really shows off the attractive red berries.
Now that you know how to grow Goji berries at home, maybe we should delve into just why you might want to do so! Goji berries are considered to be a “superfood” and have growing in popularity among health-conscious consumers. They can be particularly beneficial to vegan diets. The berries contain all 8 essential amino acids and are a surprisingly good protein source! There are about 4 grams of protein in every ounce of berries.
Goji berries are also rich in antioxidant compounds, and several preliminary studies have indicated that they can have positive effects on the aging process, energy levels, glucose control, immunomodulation, and more.
Unripe Goji Berries at Edible Eden’s HQ
Because of their medicinal value, it is always best to check with your doctor before adding Goji to your diet, especially if you are pregnant or have any pre-existing conditions. Goji berries can interact with certain medications or autoimmune issues, and may cause unwanted uterine contractions during pregnancy. The berries are considered to be safe and beneficial for healthy consumers.
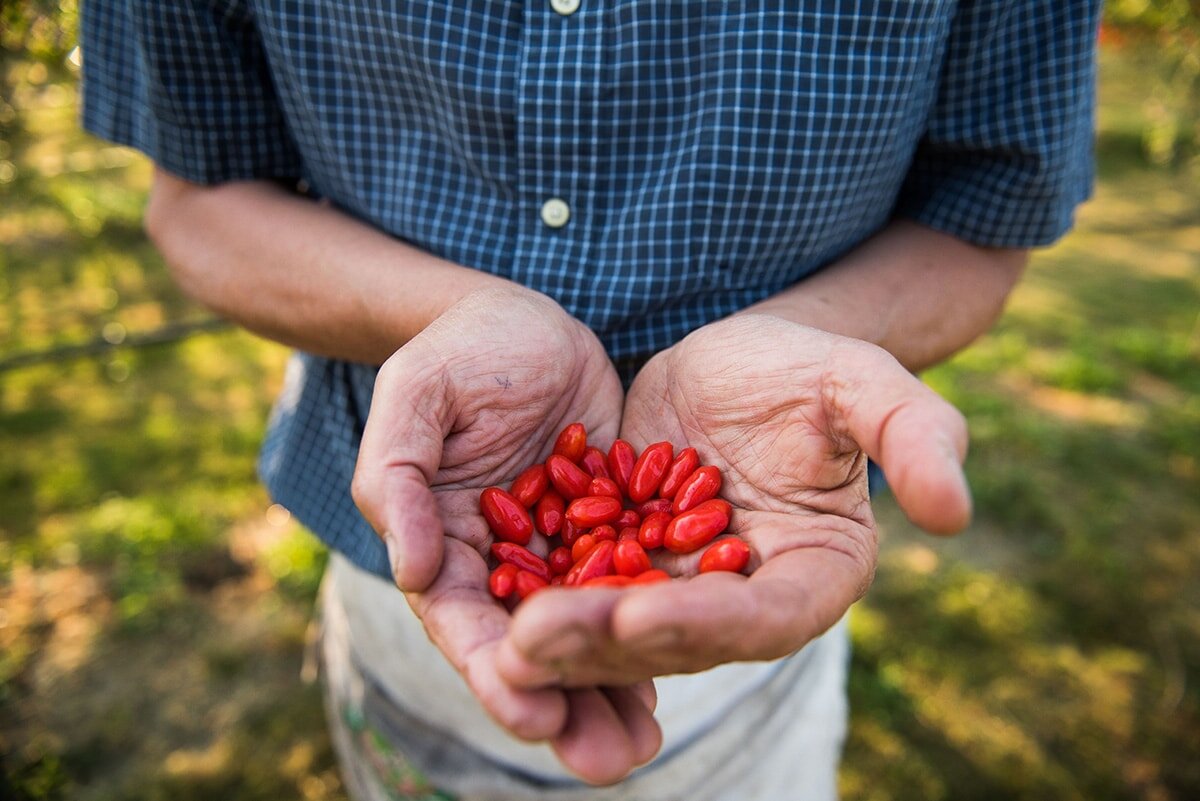
Image courtesy of Taves Family Farm: https://www.tavesfamilyfarms.com/goji-berries/
Enjoying the berries fresh off the plant is an acquired taste; they can be pretty sour or bitter. They are most often dehydrated and enjoyed like dried cranberries, perfect to add to a salad or trail mix. We also found the following jam recipe on the Plant Based Eats Youtube channel.
1/2 cup of fresh goji berries. Or 1/4 cup of dried goji berries reconstituted in water for five minutes 1:1
7 medjool dates
2 tbsp of chia seeds
1 tsp of beet root powder
1 tbsp of lemon juice
1/2 cup of purified water
Blend for 20 seconds. Refrigerate for 30 minutes.
Refrigerate leftovers. Will stay good for a few days.
Makes 1 cup of jam.
*The lemon not only adds flavor and nutrition, it helps to naturally preserve the jam.

© Photo by Grace Fellner
It is true that all of Edible Eden’s gardens (and gardens everywhere!) would be desolate and barren without the work of these fastidious pollinators. While they are not the only pollinators in town, bees are comprised of a vast family of species who are essential to natural ecosystems as well as cultivated crops. Every time you pick a blueberry or a tomato, thank a bee!

An image of bees, beekeepers, and honey from the tomb of Pabasa in Luxor, Egypt.
Human civilizations have been aware of the importance of bees since long before science parsed out why and how. Humans have been harvesting wild honey for thousands of years, but the earliest known records of intentional beekeeping date back to Ancient Egyptian society where bees were worshipped and believed to fall to the Earth as tears of the sun god, Ra. The depicted beekeeping methods are so advanced that it’s thought that they were developed long before the details were recorded in hieroglyphs.
While they may no longer be worshipped as deities, bees are as important as ever to modern society. In addition to producing 163 million pounds of honey in the USA annually, honeybees are vital to the agricultural industry as crop pollinators. According to the FDA, bee pollination accounts for about $15 billion in added crop value.
Honeybees aren’t the only superstars in town; in fact, they’re not even from around here! The United States has been a home to over 4,000 native bee species long before honeybees were introduced by European settlers in the 1600’s. This is a surprisingly little known fact, as many “Save the Bees” campaigns focus on honeybees, who are declining due to intensive farming practices that leave them weak to parasites and disease.
Habitat loss and pesticides are also contributing to the decline of both honeybees and our native bees. Competing with honeybees for limited resources has been an immense strain on native bee populations. Losing our native bees would be devastating to our local ecosystems and complex food webs, and they need our support to survive!
Fortunately, we are here to teach you how to give back to these essential frontline workers. Stay tuned for upcoming articles on how to attract and support bees and live among them safely, the benefits and types of native bees, and how planting specific native plants can help bees to successfully breed and raise their next generations.
Native bees visiting a sunflower for nectar, pollen, and naptime.
© Photo by Grace Fellner

Zebra Swallowtail (Protographium marcellus) ovipositing on Paw Paw tree. (Photo by Meghan McCarty - blueridgediscoveryproject.blogspot.com )
Build the soil ecosystem, restoring our rapidly disappearing topsoil
Minimize the need for fertilizers, pesticides, and fungicides
Catch stormwater, decreasing the threat of floods and reducing run-off and erosion
Trap carbon in the soil
Support biodiversity and native wildlife
Reduce and responsibly use waste
Native plants support native wildlife. Many insects, birds, and other animals have co-evolved alongside their food sources and habitats (plants!) and can only survive and reproduce alongside these specific species. As more land gets developed and non-native species continue to dominate our landscapes, we believe that it’s our responsibility to nurture the plant-animal interactions native to these soils.
Some of our favorite Maryland-native plants include:

Asimina triloba - Paw Paw
Paw Paw trees:
Paw Paw trees (Asimina triloba) are the sole host plant for Zebra Swallowtail butterflies. A butterfly “host plant” is a specific plant that is edible to their caterpillars. It is the only place that the butterflies will lay their eggs. No Paw Paw, no Zebra Swallowtails! The Paw Paw’s unique, early spring flowers also produce a delicious edible fruit. Learn more about Paw Paw trees by clicking here!

Asclepias incarnata - Swamp Milkweed
Milkweed:
We plant both Butterflyweed (Asclepias tuberosa) and Swamp Milkweed (Asclepias incarnata) in our gardens. Milkweeds are the well-known host plants of Monarch butterflies!

Amelanchier canadensis - Shadbush / Serviceberry (Image by Tom Palmer - marylandbiodiversity.com )
Shadbush:
Also known as Juneberry or Serviceberry, Shadbush (Amelanchier canadensis) is a beautiful flowering small tree or large shrub that is often used in landscapes for its ornamental value. The early blooms are an important Spring nectar source for beneficial pollinators and the edible fruits are loved by many birds, including orioles, cardinals, and cedar waxwings. The foliage is also a host to the caterpillars of several species of butterflies, including tiger swallowtail, viceroy (a monarch lookalike!), striped hairstreak, and red admiral. Click here for our Sweet Sweet Serviceberry Jam recipe!

Chasmanthium latifolium - Northern Sea Oats
Northern Sea Oats:
Native grasses tend to be underappreciated, but there’s no denying the whimsical ornamental value of Northern Sea Oats (Chasmanthium latifolium). In addition to adding its flowing movement to your landscape, this grass is also a host plant to several species of equally whimsical skipper butterflies.
The plants covered in this post don’t even scratch the surface of our native biodiversity. There are plants that can be used for rain gardens, pollinator gardens, as part of your permaculture plan, or simply integrated into your decorative landscaping. Whichever native plants you choose to nurture, you are bound to appreciate the benefits of seeing your garden transform into a living, breathing ecosystem.

Earlier this spring we had two really exciting opportunities I wanted to share with you all.


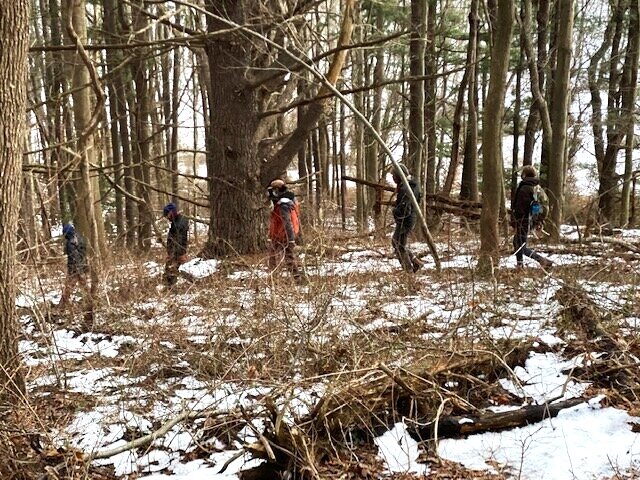
First, our favorite reconstructionist synagogue, Oseh Shalom, received a grant from the Chesapeake Bay foundation to plant 60 native trees on their beautiful campus in Laurel, MD and hired Edible Eden to implement it.
We worked with the synagogue lay leadership to choose the trees, and along with planting many beautiful native trees like Redbuds, Sweet Bay Magnolia and Willow Oak that look great, sequester carbon and support local birds and pollinators; Edible Eden had the opportunity to plant our first, native, food forest on the synagogue grounds.
We started with blight resistant Chestnuts, Hardy Pecans, and American Persimmon trees for the highest canopy layer and then interplanted Serviceberry, Paw Paw and Hazlenuts for the understory.

We rented a two-man, tow behind auger to dig the 60 holes and then created mulch rings and installed oak stakes for each tree.
As I was pushing the two-man auger around the grounds with Jax, our perennials lead, I paused for a moment to enjoy the spring sunshine, drifts of cherry blossoms, and the sounds of forest edge birds. I rested against the machine, looked around and realized I was living my dream. I was in the process of getting paid to plant native fruit and nut trees on suburban lawn. The trees we planted will hopefully feed people I will never meet along with countless birds, squirrels, deer, and other critters.
The following week we had the opportunity to work with local nonprofit Baltimore Orchard Project to plant 20 fruit tree guild gardens in Baltimore’s Druid Hill Park. Each guild included a beautiful fruit tree from Tree Authority including disease resistant varieties of Apple, Pear and Asian Persimmon. Each tree was planted inside a deer ring with an assortment of pollinator and companion plants.

The sod was difficult to strip and heavy to move but working with a great team of folks from Blue Water Baltimore, Tree Baltimore and Real Food Farm (all at appropriate social distance wearing masks of course) we got them all planted out. The edible eden team was racing the clock to get to the next job, and I pushed my body harder than I like pounding 20 Oak stakes in with an oversized post pounder in quick succession… but feeling sore, walking up the hill and looking back at this fledgling orchard, appearing in such a short window of time, felt magical.
I was struck by how, in setting out to start Edible Eden in 2014, I wanted my passion for making the world a more fruitful, abundant, compassionate and beautiful place to become my livelihood- the thing I spent the bulk of my time and energy doing.
And while the reality of creating, building and growing a sustainable small business is endlessly challenging and sometimes anxiety producing; and I spend lots of time banging my head against the Quickbooks and staring at spreadsheets…I am conscious of the great blessing and privilege I have to be doing this work, and the gratitude to the customers, partners and staff that allow me to keep doing it…honestly; this is what living a dream looks like.

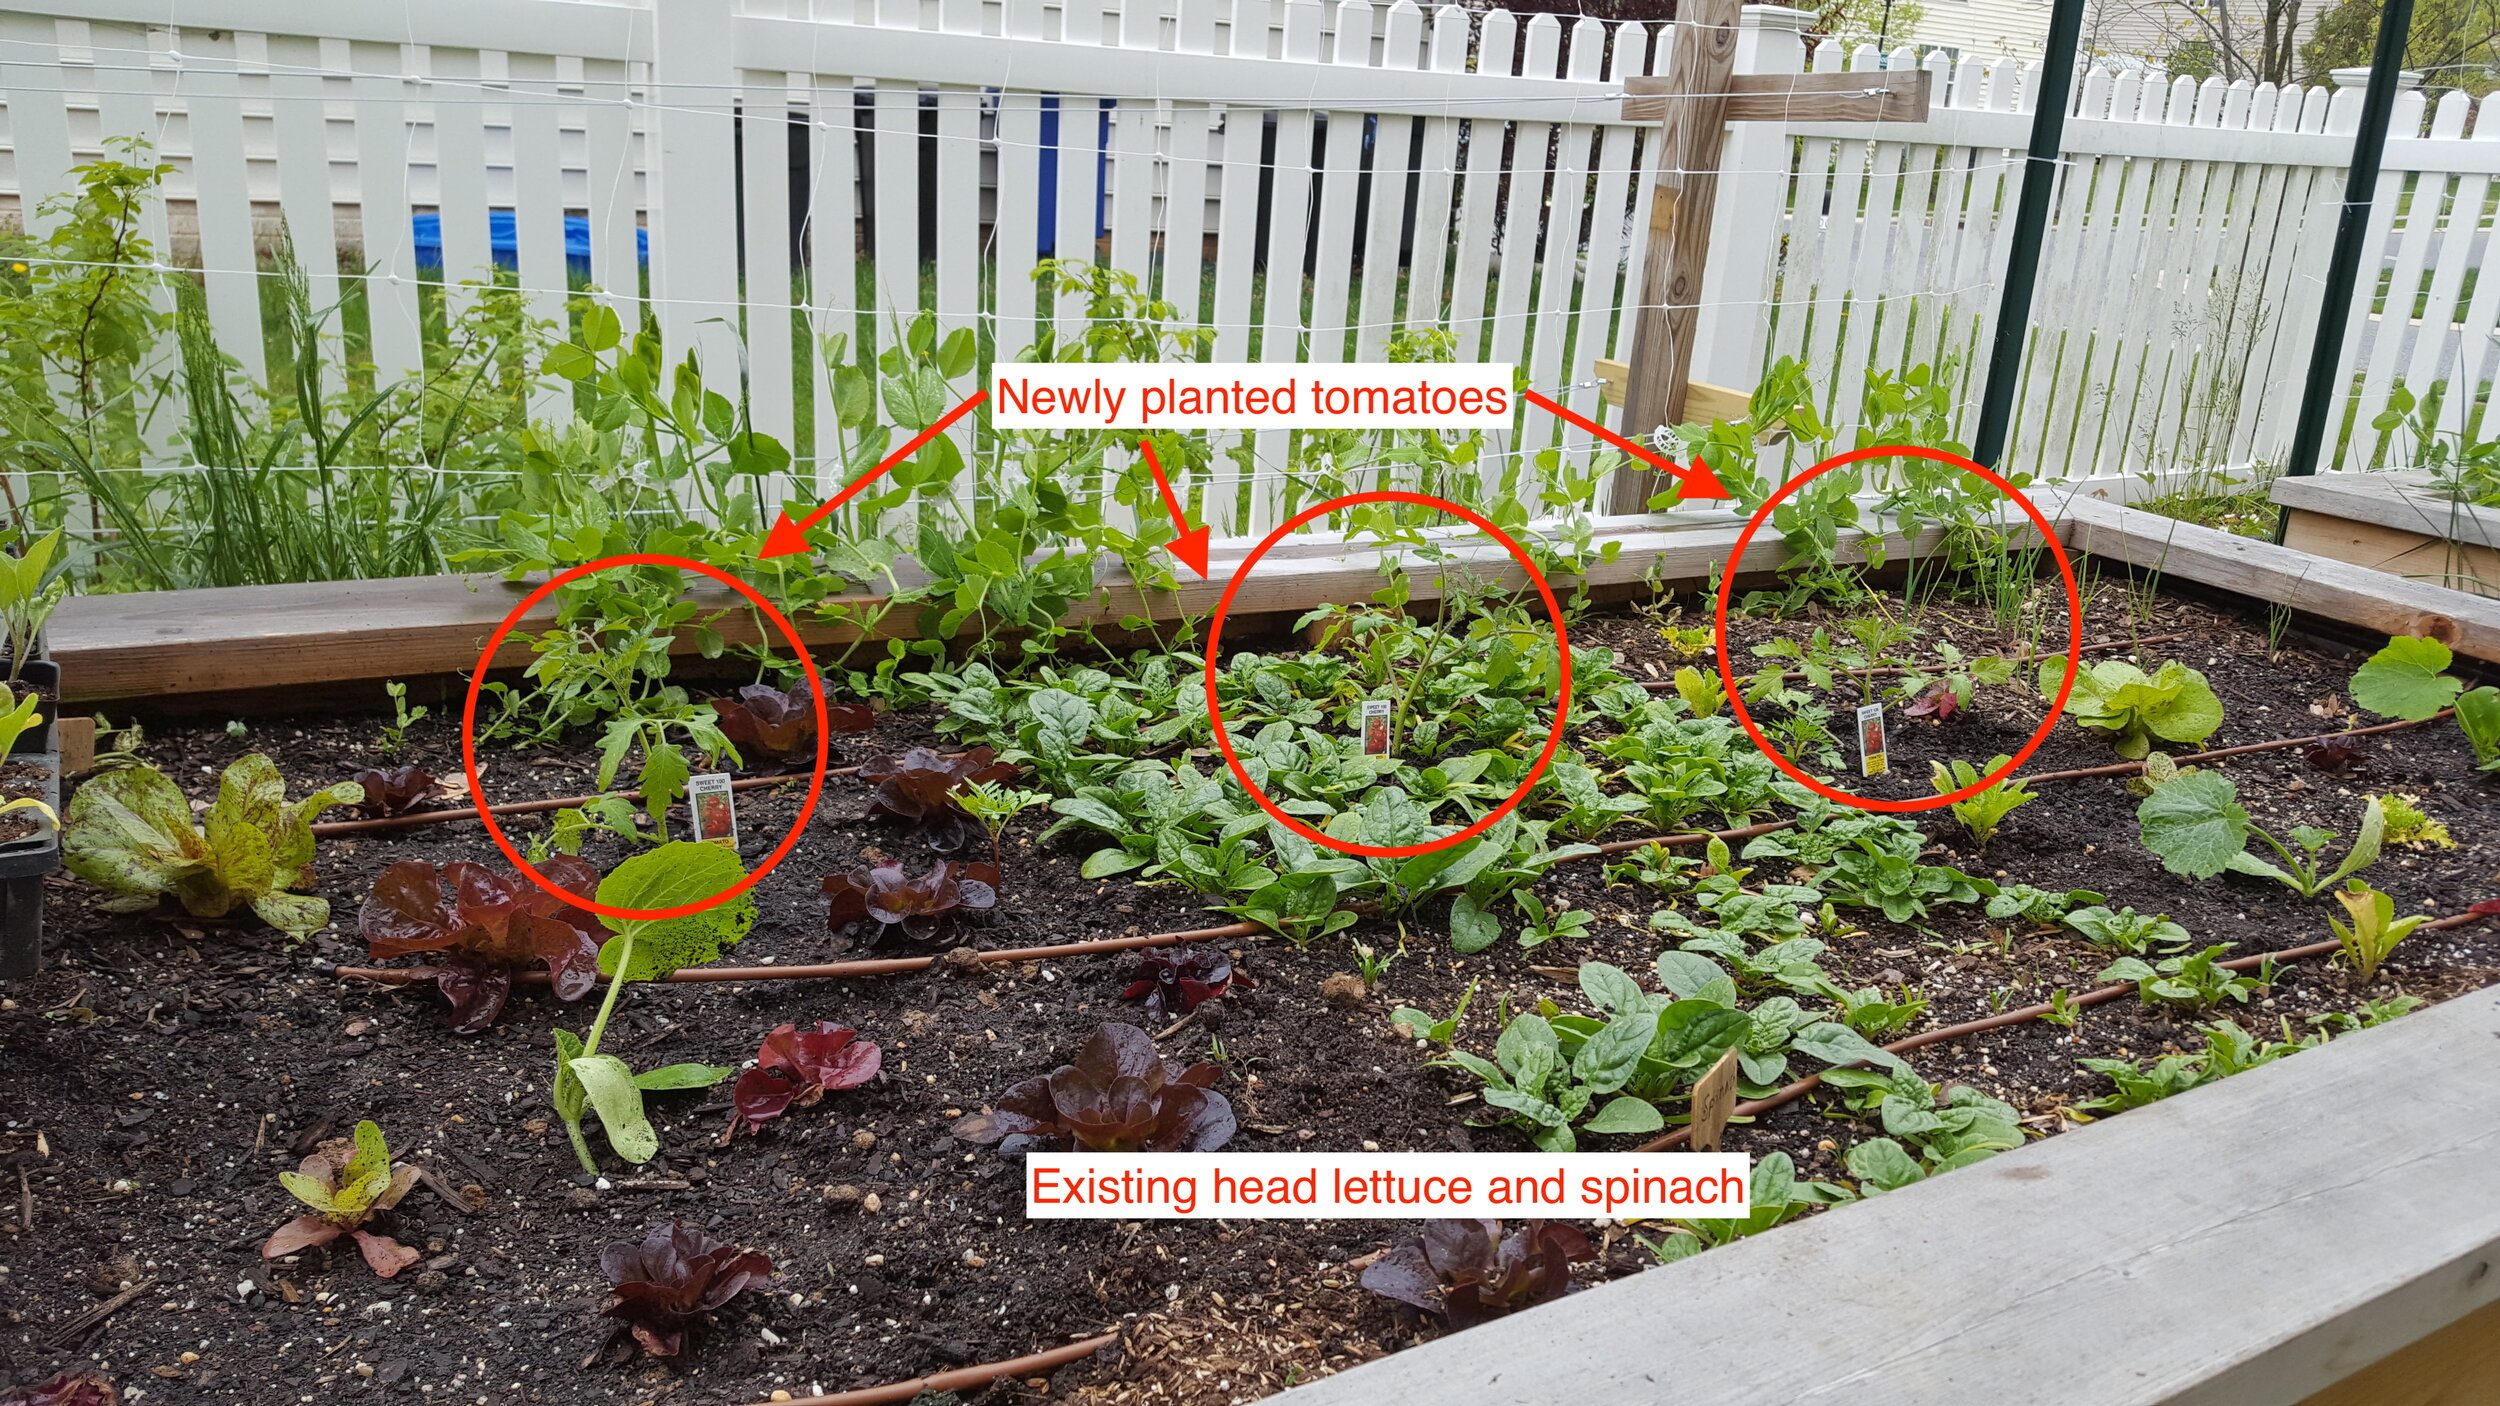
In this raised bed, we fit three new tomato plants while allowing head lettuces and spinach to continue to grow. Much like the garden pictured above, the tomatoes will grow in between the head lettuces, which will be harvested by the time the tomatoes need space. The bed of spinach, on the other hand, can be harvested continuously underneath the new tomato plant and will provide a “living mulch” to keep the ground moist and cool.


Here in the Baltimore area, the very first crops that go in the ground are peas. Peas don’t like the heat and their flowers won’t produce fruit if temperatures rise too high. Getting peas in the ground early ensures that they will have a long season in which to produce plenty of fruit. We always plant peas by seed and plant at least two successions as timing can be a gamble this early in the year.
After peas come hardy greens from seed - kale, arugula, spinach, and more will germinate on warm days but stay hardy in brief cool snaps.

In early to mid March, you can begin sowing your first succession of root crops like carrots, beets, turnips, and radishes, too!

By the end of March, we’ll begin transplanting seedlings into the ground. Because seedlings are typically grown in a warm, bright, and reliable greenhouse environment and then planted outside where the temperature may be colder, sun may be brighter, and water may be less consistent, they can be a little finicky. When buying seedlings, make sure to ask your nursery if they’ve been “hardened off,” or acclimated to the outdoors. We wait to plant our seedlings until we are certain that there will be no more hard frosts to shock them.
Planting brassicas like cabbage, broccoli, and cauliflower from seedling gives us a jump start on their long growing season and gives them the best chance to become established and strong before the cabbage loopers come out.

Last month, our team attended the Pennsylvania Association for Sustainable Agriculture (PASA) Conference. We had the opportunity to attend classes from leading experts in soil science, holistic orchard management, mycology, food sovereignty, and more! We always love connecting with folks who share our values of stewarding the earth, supporting biodiversity and ecosystem health, and eating fresh, local, delicious food. We are especially grateful for the good folks at PASA and all of their supporters who make scholarships and work-shares possible - We appreciated the opportunity to drive our whole team up and found volunteering to help the event run smoothly particularly rewarding!
Attending this conference gave us the opportunity to catch up with the most recent research and practices in regenerative agriculture and reassess our own values and practices. While the inspiration is fresh in our minds, we figured now is a good time to share a little more in-depth information about our practices in the garden and how they align with our values and the permaculture, organic, and regenerative agriculture movements.

For the next few months, we’ll be sharing one aspect of our garden practices and we will talk about how those growing practices help to achieve the goals listed above. Follow along to learn more about us and for tips on how to make your farm, garden, or landscape more eco-friendly!

Broadfork image, courtesy of Lehman’s

Although this eggplant lead if riddled with holes, it actually withstood the flea beetle damage and ended up producing a flush of fruit!

This, on the other-hand, is too many hornworms for comfort!

Watering in the morning and from below (not above) ensures that water doesn’t sit too long on the leaves of your crops. Stagnant water can cause disease and attract pests.
Are you buying pest/disease resistant plant varieties?
Are you watering properly?
Are you keeping your garden tidy?
Handpick pests you see, squish eggs (once you have properly identified them!), prune off disease.
Consider using physical barriers like floating row cover or sticky traps.

Floating row cover is a great way to keep pests away from your crops

The same row, uncovered, with untouched brassicas!
Include plants in your garden that will attract beneficial insects that will keep pests at bay.
Import natural predators that will target and control your pests. Ladybug and Mantis eggs can easily bought and shipped to be placed around a garden.
As a last resort, you can spray. Use targeted, organic treatments where possible and spot treat rather than spraying your entire garden. Apply sparingly and responsibly.

Lady bugs can be bought online or at many nurseries to battle aphid populations.

Soldier beetles are predatory and enjoy a wide range of insects. Providing nectar flowers and habitat helps attract predatory insects to your garden.

Transplanting can be a stressful experience for plants; new soil, new temperatures, new nutrients and moisture levels need to be acclimated to before the plant can kick back into gear and grow as usual. If moved suddenly without being hardened off, watered in, or timed well, plants may experience transplant shock and exhibit drooping, limp leaves and stems.
While planting your trees in the Winter isn’t essential, it can help in preventing transplant shock. Planting while trees are dormant causes the least disruption and gives them plenty of time to acclimate to their new environment and develop a strong root system well before the stress and heavy production of Summer hits.

First, make sure to find the right tree for the right place - if you have a space you want to fill, take note of the sun, soil moisture, and the size of the space and find a tree that will thrive in those conditions. Keep in mind that natives, in addition to supporting native wildlife, are better adapted to our local environment and will likely be more low-maintenance and healthier. If you are planting a fruit tree, make sure to get a disease resistant variety that is well adapted to our climate.
Once you have a tree and a spot to plant it, dig a hole at least twice as wide as the tree’s root ball and about as deep. The sides should be sloped rather than straight up and down and the surface should be roughed up, not smooth. This helps roots and water penetrate through.
Free up the roots! If you have a “bare-root” tree, the roots should already be free and untangled. But if your tree came “balled and burlapped” or potted, take it out of the burlap or pot and untangle the roots. It’s okay to tear a few smaller roots - in fact, this will encourage further root growth. Free up the largest roots, using a hand rake or a knife if it’s really tough.
Test the tree placement and size of the hole by placing the tree inside. Major roots should have room to stretch out. The soil level should reach an inch or two from the top of the root-ball, keeping the “root-flair” exposed. Planting the tree too deep will cause soil to push up against the tree trunk - this can cause rot and encourages disease. Adjust the hole as needed. Test the orientation of the tree as well. If the tree is next to a path or a house, make sure major branches are growing in the opposite direction so they don’t interfere!
Once your tree is placed, back fill the hole, adding compost if needed. After every few inches of soil is added, tamp down the soil with the shovel and your feet.
Mulch in a circle about 2-3” deep and about 2 feet from the trunk in every direction. (At least as wide as the tree’s crown.) Pull soil and mulch a few inches away from the trunk, creating a “donut” shape to keep from burying the root flare..
Water! At the time of planting add 15-20 gallons of water. Water regularly during the first Spring and Summer.

Careful planning is essential for maximizing space and for a tidy garden!
Plant what did well and think back to what didn’t do well - do you know why it didn’t thrive? Is there another place in your garden where that crop would do better (that may be sunnier, more moist, less accessible to deer, etc.)?
You also want to consider what you planted and where so that you can rotate your crops. Crop rotation can contribute to healthier soil and lower pest pressure. Some crops are heavier feeders while others replenish nutrients. For example; following heavy feeders like broccoli with nitrogen fixers like beans can replenish some of the soil’s lost nutrients. Additionally, some pests can overwinter in the soil and will continue to be a problem year after year if the pest’s host plant is kept in the same place. Cycling your crops through different beds to ensure that the same family isn’t in the same place twice may help disrupt the pest cycle.
If you experienced a swarm of cabbage worms last year, taking a season off of Brassicas (their host plant) may effectively drive them away in time for a Fall planting. Focus on other families like amaranthaceae (which includes beets, spinach, and swiss chard) or Apiaceae (which includes, cilantro, parsley, and celery).
As you rotate your crops, keep in mind the conditions where you’ll be planting! Different beds may have different sun exposure, weeds, moisture levels, and pests. Even if you have a container garden, different pot materials may affect soil moisture, shape may affect soil depth, and placement may affect sunlight. Make sure you know which conditions are ideal or acceptable for each of your crop varieties.

Garden planning helps you estimate quantities of needed seeds and seedlings, maximizes the garden’s yield, and makes for a tidier garden.
Planning ahead of time can help you determine the number of plants that can actually fit in your garden. This not only helps you purchase the correct amount of seeds and seedlings but helps you stay conscious of spacing.
It can be tempting to plant as many veggies as fit into your garden - the more the merrier, right? Not always… Compact plantings can decrease necessary airflow between leaves which can lead to a myriad of diseases and pests. To many plants in one space also means competition for space, sunlight, and nutrients. You can find proper spacing information on the back of most seed packets.
Similar to spacing, it can be tempting to plant all of your seeds at the same time, as early as possible. Timing is important - temperature affects seed germination and plant health. Including timing in your garden plan will remind you of proper timing and ensure your veggies have the best chance of being healthy and productive.
Taking both timing and spacing into account - it can help to plan for multiple successions of a crop by leaving room and noting a second sowing date. Planting a crop every two or so weeks within the appropriate window (“Succession planting”) can safeguard your crops against pests and diseases and extend the harvest. Maybe your first round of lettuce gets eaten by early season slugs - you still have a second crop to lean on! The slightly later planting may be late enough for the slugs to be driven away by the heat. And if each succession thrives, you’ll have a well-distributed harvest rather than having 15 head lettuces all at once.

We like to use excel so we can easily see how the gardens will progress through-out the seasons and can make edits when unexpected changes occur. Making a low-tech garden map for each season can work just as well!

The key to treating hornworms is catching them early. Regular inspection is key!
At least once a week, walk around your garden and observe it closely. Look at the soil, the undersides of leaves, the joints of your plants. Do you notice any holes in the leaves? Any spotting, yellowing, or browning? Do you see any insects? Frass? Eggs?
Identify what those symptoms or insects are. Are the spots on your leaves yellow, brown, white, or black? What is that insect? What are the eggs on the underside of your squash leaves? Insects can be especially hard to identify - many look very different in their nymph stage from their adult stage. Try to learn how to ID each step of their maturation.
Once you’ve properly identified a pest, learn about its life-cycle and biology. What can they eat? What attracts them? Do they lay their eggs in the soil or on the plant? Are they pests during their whole life cycle or just when they are nymphs? At what stage of their life-cycle is treatment effective

Would you recognize this as a ladybug larva?

Lady bugs are an extremely beneficial insects - they happily eat all the aphids in your garden.

Insects like this Swallowtail Caterpillar may seem like a pest at first - they eat parsley, dill, and fennel. But if you let them pupate, they’ll reward you as beautiful and beneficial pollinators.

As we enter the cold Winter months and our gardens are put to bed for the season, we start pulling preserved food from our pantry; canned fruits, pickled veggies, and dried herbs.
While some types of produce will store well (like onions, garlic, and winter squash) did you know that even these vegetables must go through a preservation process called “curing” in order for them to last into the winter?
Vegetable curing isn’t quite like meat or cheese curing - no salt or smoke is involved. But it is similar insofar as it dries out the outer skin of the vegetable to make it shelf stable for a longer time than if it were stored fresh out of the ground. Not all veggies can be cured, but below we’ll outline the curing and storing process for some favorites that are commonly found in our gardens.
Curing vegetables may seem like something only an old timey root cellar can accomplish, but it’s easier than you think to find or make the right environment for each of these veggies in your own home. For cool, dark places - check out your basement, attic, or even an unused cabinet or closet. For warm places consider a sunroom, a sunny window, or just leaving the veggies out in the garden. (But check the weather for rain or temperature drops first!) Storing your cured veggies in containers like crates, baskets, mesh bags, or laid out on a shelf can encourage the necessary airflow.

Red Wiggler Composting Worms, photo from http://working-worms.com/how-to-make-your-own-worm-farm/

A worm bin made from Tupperware containers, photo from https://www.canr.msu.edu/news/worm_composting_or_vermicomposting
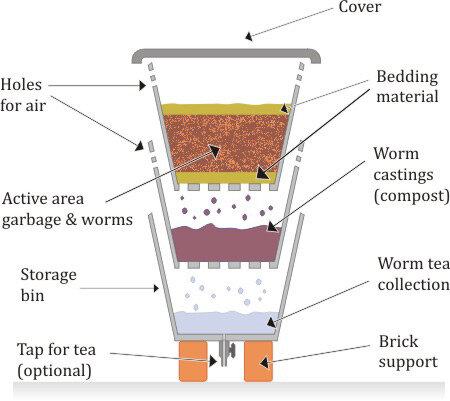
Upward Migration System, photo from http://working-worms.com/how-to-make-your-own-worm-farm/
The most common vermicomposting system for households is an upward migration system, also called a “worm hotel.” These systems are composed of at least three trays with mesh bottoms. They stack on top of one another allowing for the worms to crawl freely between them. Start with one tray and as it fills up you add another tray and another until they are all full. The worms will crawl up towards the surface and towards new food as they finish the food in the bottom tray. By the time all of the trays are filled, the bottom tray should be ready to harvest.
Find more info about how to start vermicomposting here!

With the last crunchy leaves spiraling down on the frosty winds of December, the soil starting to freeze, and the vegetable crops finished for the season; this is a reflective time for us here at Edible Eden. Winter is our planning time, our business development time as well as some time to breath, evaluate and rest from the growing season.
This past year has been our best to date; we’ve reached new levels of functional design and productivity in creating and stewarding food gardens all over the Baltimore metro area. We’ve generated thousands of lbs of organically cultivated produce, grown our team in order to build our capacity and worked with more knowledgeable and dynamic employees than ever before. We’ve planted hundreds of fruit trees, berry bushes, and native perennial plants around the area and served an ever growing and diverse clientele of wonderful customers.
But this is not just about the success of a small business.

Here at Edible Eden we believe that every square foot we have under our stewardship allows us to make the world a better place. We plant native plants to host native wildlife and strengthen eco-systems. We plant organic veggie gardens to help re-direct food sourcing from the industrial food system. We support our customers in composting and rain water management to ensure we are contributing to healthy soil ecosystems and mitigating harmful runoff.
It’s not always easy - sometimes this means hand-picking pests, finding hard-to-source materials and a lot of explanation of our services. But the results are worth every moment of hard work. We see our successes reflected in the bio-diversity supported by our gardens, in the joy of seeing our customers taste and enjoy a new local, healthy food; in the pollinators buzzing happily around diverse blooms.
Next year we will continue to enhance our business systems, expand our operations, and hone and improve the products we offered in 2019.
We know that we wouldn’t be able to do the work that we love without you, our customers and broader community! We want to thank you, sincerely, for being a part of this exciting experiment: Can we, together, vision and work towards a more sustainable, abundant and compassionate human reality?
So here is gratitude for a bountiful growing season, and hopes for a cozy Winter, and a new year full of diversity, deliciousness and joy.


